Timeout and Heartbeat with TornadoFX
July 18, 2018
For security, we often want an application's session to timeout. This forces the user to login and prevents open access to an unattended application. To implement a timeout feature, you need to keep a running count of inactivity and compare that to a preset value. If the user becomes active as defined by your application the running count with reset.
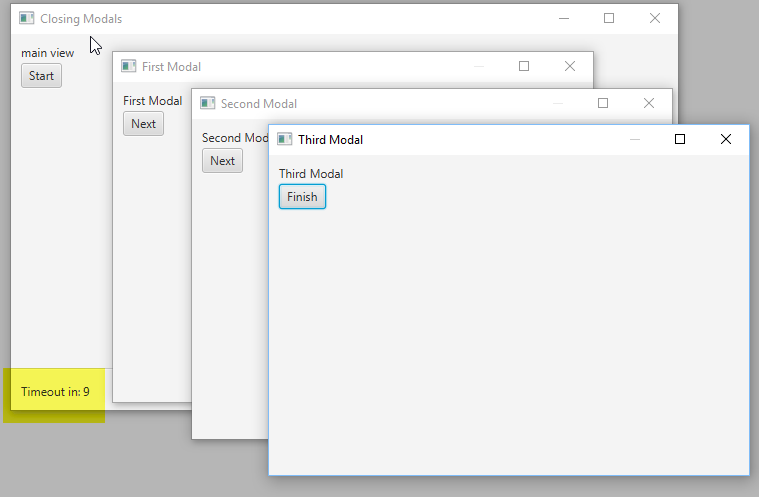
This demo TornadoFX application allows the user to bring up three modal dialogs that will be closed when a timeout occurs. From the main view, the user brings up the first dialog. From the first dialog, the user brings up the second dialog. Finally, from the second dialog, the user brings up the third dialog. If the user closes the third dialog, all of the dialogs will close.

Screenshot of TimeoutApp
The timeout feature is invoked when the user fails to move the mouse within the 15 seconds. Every 3 seconds, the app checks for mouse movement. If there is none after 15 seconds, all of the dialogs close and the user is left with the main view.
Event Bus
The implementation I chose uses the TornadoFX Event Bus. The Event Bus is a lightweight message-passing mechanism that decouples your classes. Instead of working with handles to UI controls, UI controls subscribe to interested events. This is a scalable architecture since any control can register for an event without modifying the publisher.
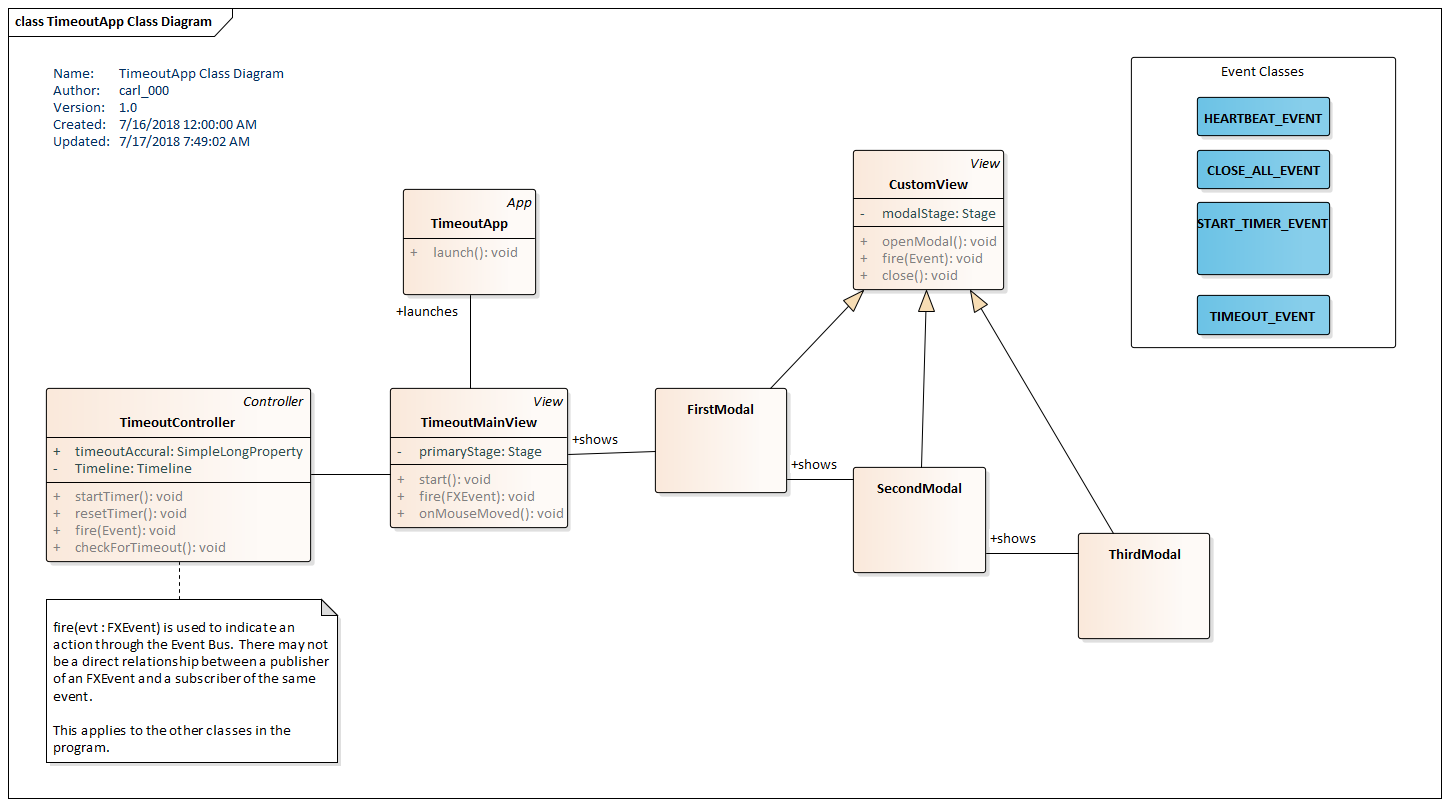
The following UML class diagram shows the events supported in the upper left. They are
- TIMEOUT_EVENT
- CLOSE_ALL_EVENT
- START_TIMER_EVENT
- HEARTBEAT_EVENT
Each _EVENT is a Kotlin object of type FXEvent.

TimeoutApp Class Diagram
The fields, functions, and relationships of the UML diagrams included in this post are logical and may not be realized as Kotlin syntax.
Controller
The program starts with some constants for tracking the timeout time and the interval for the timeout check. These numeric constants are followed by several FXEvent objects that cue the timeout and close behavior.
const val TIMEOUT_CHECK_INTERVAL = 3L
const val TIMEOUTVAL = 15L

object TIMEOUT_EVENT : FXEvent()
object CLOSE_ALL_EVENT : FXEvent()
object START_TIMER_EVENT : FXEvent()
object HEARTBEAT_EVENT : FXEvent()
The application uses a Controller named TimeoutController to manage the polling with a JavaFX Timeline. There's also a property timeoutAccural which maintains the countdown time. This property is exposed to other classes for presentation to the user.
class TimeoutController : Controller() {

  val timeoutAccural = SimpleLongProperty()

  private var timeline : Timeline? = null

  init {
    subscribe<START_TIMER_EVENT> { startTimer() }
    subscribe<HEARTBEAT_EVENT> { resetTimer() }
  }

  private val checkForTimeout = EventHandler<ActionEvent> {

    timeoutAccural.value +=  TIMEOUT_CHECK_INTERVAL

    if( timeoutAccural >= TIMEOUTVAL ) {

      if(timeline != null )
        timeline!!.stop()

      fire(TIMEOUT_EVENT)
    }
  }

  private fun startTimer() {
    timeline = Timeline(
      KeyFrame(
        Duration.seconds(TIMEOUT_CHECK_INTERVAL.toDouble()),
        checkForTimeout
      )
    )
    timeline!!.cycleCount = INDEFINITE
    timeline!!.play()
  }

  private fun resetTimer() {
    timeoutAccural.value = 0L
  }
}
The Controller subscribes to a pair of events: START_TIMER_EVENT and HEARTBEAT_EVENT. When START_TIMER_EVENT is received, the Timeline animation for trackingthe timeout begins and runs for the life of the program. The value tracking the timeout, timeoutAccrural, is reset whenever the Controller receives the HEARTBEAT_EVENT.
Main View
The main view of the application, TimeoutMainView, is a Label and a Button. The Button action will bring up the first of the modal dialogs, FirstModal. When TimeoutMainView is shown, it fires an event to the Controller to start the timer. TimeoutMainView displays the countdown to timeout using a bound property. Notice the subtract() binding which turns the accured value into a countdown.
The onDock() method also registers an Event Handler with the Scene to reset the timer with each mouse movement. The Scene is the toplevel object that will receive all mouse movements in the app when the main view is showing.
class TimeoutMainView : View("Closing Modals") {

      private val controller : TimeoutController by inject()

      override val root = vbox {
            vbox {
                  label("main view")
                  button("Start") {
                        action {
                              find<FirstModal>().openModal()
                        }
                  }
                  spacing = 2.0
                  padding = Insets(10.0)
                  vgrow = Priority.ALWAYS
            }
            separator()
            hbox {
                  label("Timeout in:")
                  label(SimpleLongProperty(TIMEOUTVAL).subtract(controller.timeoutAccural).asString())
                  padding = Insets(10.0)
                  spacing = 2.0
            }
            spacing = 2.0
            prefWidth = 667.0
            prefHeight = 376.0
      }

      override fun onDock() {
            fire(START_TIMER_EVENT)
            primaryStage.scene.onMouseMoved = EventHandler<MouseEvent> { fire(HEARTBEAT_EVENT) }
      }
}
The Modals
The three modal dialogs inherit from a base class CustomView. CustomView subscribes to the two events used by the modals: TIMEOUT_EVENT and CLOSE_ALL_EVENT. All the modals respond to the events in the same way by closing themselves.
abstract class CustomView(title : String) : View(title) {

      init {
            subscribe<TIMEOUT_EVENT> {handleClose() }
            subscribe<CLOSE_ALL_EVENT> { handleClose() }
      }

      private fun handleClose() {
            runLater {
                  if (modalStage != null && modalStage!!.isShowing) {
                        modalStage!!.close()
                  }
            }
      }

      override fun onDock() {
            if( modalStage != null ) {
                  modalStage!!.scene.onMouseMoved = EventHandler<MouseEvent> { fire(HEARTBEAT_EVENT) }
            }
      }
}
As with the main view, the modal classes add a mouse Event Handler to reset the timeout counter. This is implemented as a HEARTBEAT_EVENT received by the Controller.
WARNING: The runLater{} block in the handleClose() function was needed to fend of a ConcurentModificationException. This may be fixed in a later version of TornadoFX.
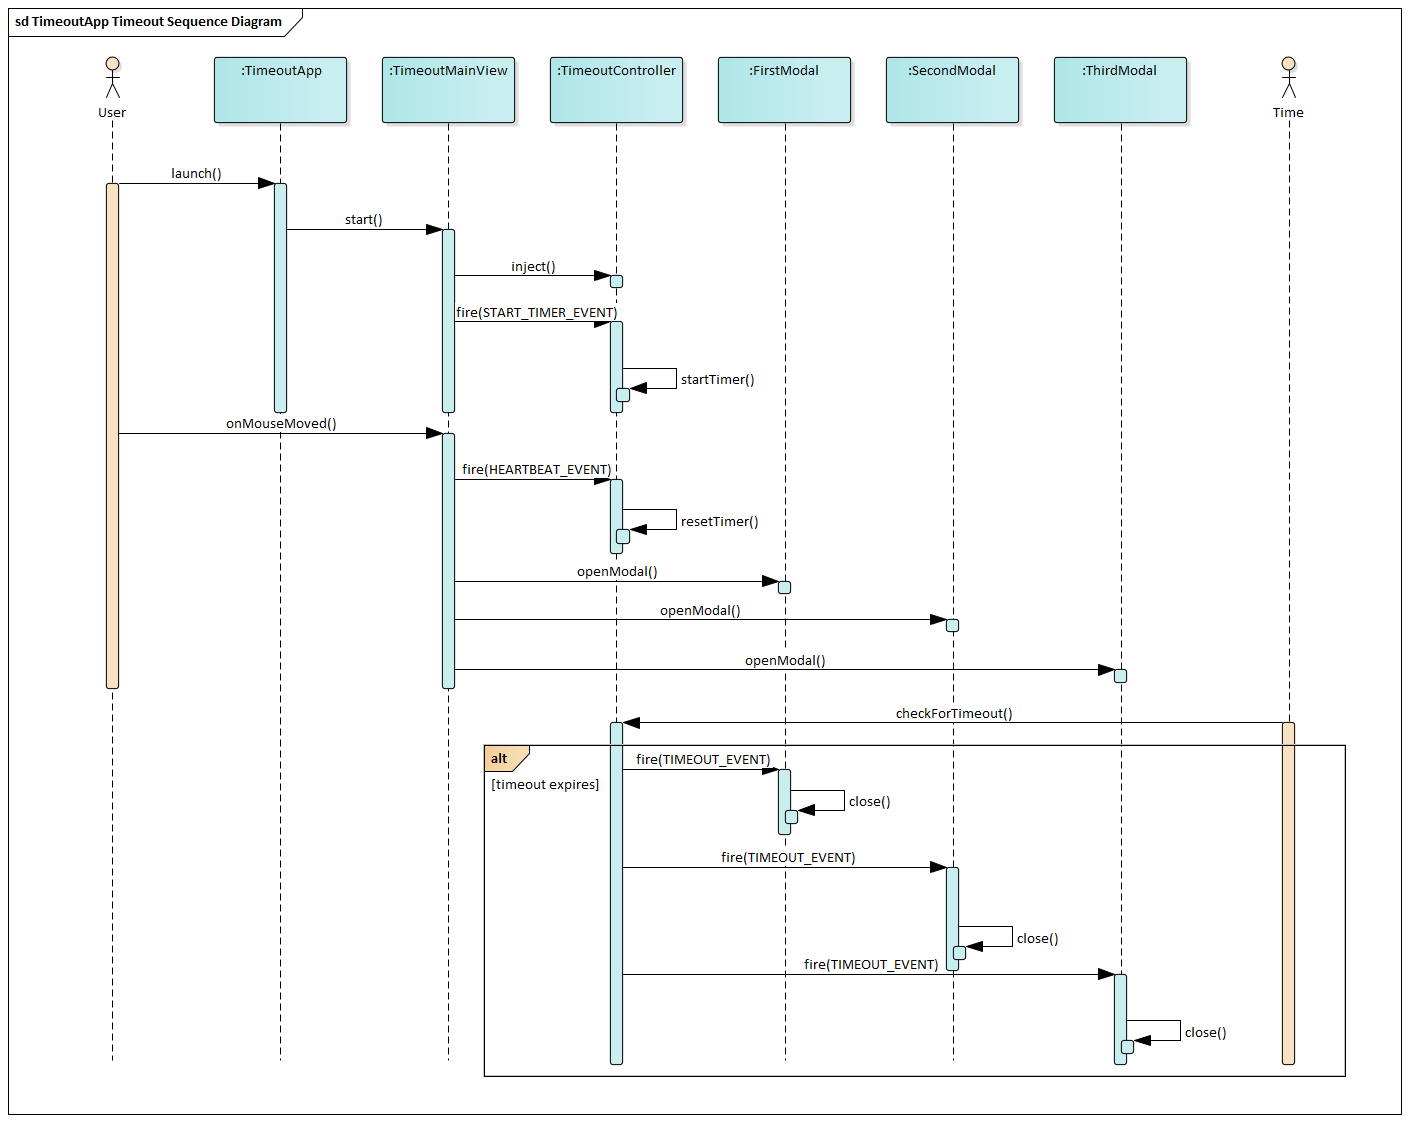
This sequence diagram shows the flow of the timeout feature. It presents a scenario that exercises each of the timeout-related events (not CLOSE_ALL_EVENT). The main view starts the timer by sending a TIMEOUT_EVENT. The user moves the mouse which generates the first HEARTBEAT_EVENT. The user brings up each of the three modals in sequence. The user lets the program wait until the timeout occurs. A timeout event is fired and handled by each modal. Each modal then closes itself.

TimeoutApp Sequence Diagram
This is the code for the rest of the modals. They differ by action, either bringing up a specific modal or firing the CLOSE_ALL_EVENT.
class FirstModal : CustomView("First Modal") {
  override val root = vbox {
    label("First Modal")
    button("Next") {
      action {
        find<SecondModal>().openModal()
      }
    }
    spacing = 2.0
    padding = Insets(10.0)

    prefWidth = 480.0
    prefHeight = 320.0
  }
}

class SecondModal : CustomView("Second Modal") {
  override val root = vbox {
    label("Second Modal")
    button("Next") {
      action {
        find<ThirdModal>().openModal()
      }
    }
    spacing = 2.0
    padding = Insets(10.0)

prefWidth = 480.0
    prefHeight = 320.0
  }
}

class ThirdModal : CustomView("Third Modal") {
  override val root = vbox {
    label("Third Modal")
    button("Finish") {
      action {
        fire(CLOSE_ALL_EVENT)
      }
    }
    spacing = 2.0
    padding = Insets(10.0)

    prefWidth = 480.0
    prefHeight = 320.0
  }
}
The EventBus provides a great way to decouple your application classes. This is useful for long-term maintenance since classes not known in advance can be invoked by the events without modifying the publisher. This avoids keeping references to UI controls for direct access which leads to coupling or, much worse, memory leaks through cycles.
There is trivial App class and a trival main function that are included in the source zip.
Resources
The source code presented in this video series is a Gradle project that can be imported into your IDE.
EventBusDemos Source Zip (3Kb)
By Carl Walker
President and Principal Consultant of Bekwam, Inc